Ok, now I need to install the View Security Server.
(See the previous post for the View Connection Server setup)
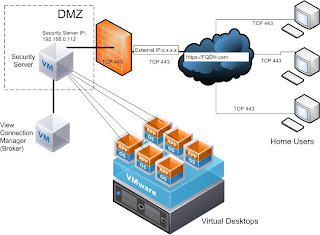
The Security Server is a proxy that channels the client connections to the View environment over a certificate-secured SSL protocol (TCP 443). The huge b
enefit of the Security Server is that only that server's IP address needs to be exposed t
o the Internet. All the client authentication and interaction happens over this gateway (is proxied), thus protecting the internal components of the envirtonment (inclusing the virtual desktop targets). here is a Visio of my setup:
The Security Server setup is very straight-forward. I spun up another W2K3Sp2 box with default settings (No IIS) and kicked off the install of View Security Server.
The install completed in a very short time. Once the install is done there are a few things that need to be done.
First, I neeed to generate a certificate. Certificate is needed for the Security Server to authenticate itself to the client. The certificate is bound to the FQDN of the Security Server. In my case it is view.esxlab.local.
To obtain the certificate, I did the following:
- Generated the secure key by runnning the command "keytool -genkey -keyalg "RSA" -keystore keys.p12 -storetype pkcs12 -validity 360" on the Security Server
- Generated the CSR by running the command "keytool -certreq -keyalg "RSA" -file certificate.csr -keystore keys.p12 -storetype pkcs12 -storepass PASSWORD on the Security Server
- Submited the resulting CSR to a Micrsoft Certificate Server running on another virtual machine in my lab. IMPORTANT: you must use the Certificate Chain otherwise the Security Server will not acept the certificate:
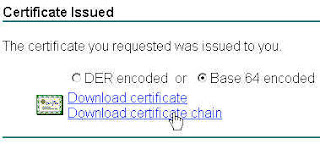
- Saved the cert (I named it MyCertName) on the Security Server and loaded it with the command: " keytool -import -keystore keys.p12 -storetype pkcs12 -storepass PASSWORD -keyalg "RSA" -trustcacerts -file MyCertName.p7
- Copied both the cert and the key under C:\Program Files\VMware\VMware View\Server\sslgateway\conf
Next, I needed to generate the security server properties file - it is done from the View Connection Server:
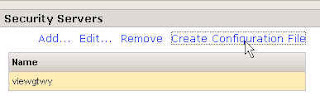
The resulting file is called config.properties BUT needs to be renamed to locked.properties and copied to the Security Server under C:\Program Files\VMware\VMware View\Server\sslgateway\conf
Once you copy the file, open it and add two variables:
- clientHost=view.esxlab.local (or whatever your FQDN is. It must match the FQDN of your certificate)
- keyfile=keys.p12
- keypass=PASSWORD (or whatever password you chose)
Now you need to restart the Security Server for the new configuration to be read.
As the next step in my Lab setup, I will create the target desktops. The procedure will be covered in the next Post.
No comments:
Post a Comment